Checkout the online shop for new parts and service for you ride!

Click Here www.hughshandbuilt.com for more info on parts! Thanks - Hughs.

Tuesday, January 18, 2011

New Product!! Solid XS650 Riser Bushings

Ok, these have been long awaited by many of you XS650 Builders and Riders.

So you got your bike built, and noticed way to much flex in the bushings on your newly built bike.  Be it a cafe racer, street tracker, restoration, chopper or bobber, no one wants to wait on the front wheel to turn while the bars are moving around like a chunk of rope attached to the trees.   You have probably already removed the stock 35 year old rotten bushings from your upper triple tree and replaced them with aftermarket rubber bushings from the "Popular Supplier Of Inferior XS650 Parts" right?   And within a year, those bushings were feeling like a wet sponge and falling apart right?   Yeah, I've been there and done that, as many of you have.

Now you can fix that slop with these newly developed Solid Riser Bushings.

Machined in-house from solid 6061 Aluminum, these new solid bushing include rubber o-rings to help fight vibrations and provide a snug fit.  Also included is all new stainless hardware (minus the large washer, it is plated).  Might as well clean up that old cruddy hardware while you are at it, so I provide new washers, lock washers, jam nut, top tree bolts and cotter pins.   This is a complete kit, no need to hunt around for new hardware or reuse the old corroded stock stuff.  Now available as a full kit for $75.00  (These can be bored out for use with Harley Style Risers as well, no extra cost)   


Kit with all new Hardware 

Hardware Assembly Order - Ditch the stock stuff...


Easy to install- Put a light coat of oil on the O-Rings, 
Then press the bushing into the upper tree.  


Once all 4 are installed, clean up the riser (that old rubber tends to build up 
on the riser studs, get that crud off there) 


Use the new hardware and reassemble your bars and risers.  Ride with confidence.


This is a limited production run.  Due to the amount of material to be machined and the cost of materials, I will not keep a large amount of these in stock.   If there is more interest,  I will reconsider.

  
To Purchase go to our Store:  http://hughshandbuilt.com/shop/


Saturday, January 15, 2011

Shiny and New? A new lease on life for 35 year old parts...

Somebody in CA is getting some shiny new forks for their motorsickle...  Shaved, polished, and beautiful.   Hope you enjoy them Mark!


Want the same radness for your boring, beat up front end?  Get the details here!!

Flip that fender - Trailer Trash turned Prom Queen

Trailer Fenders - What more can you say?

They work great, they are cheap, and they are tough.   They do lack a little bit in style though, and sometimes sacrifices have to be made right?  Wrong!!

I was watching a kickass video a while back from Special 79' about how to split a tank and put a peak down the center of it.  Something I have always wanted to do, but haven't gotten that far along in my own build just yet.    Check out the video here:


After watching the video, I watched it again.  It was that good, and Jay knows his metal work for sure.  

I, on the other hand despise doing body work, but can beat the hell out of something with a hammer.  So I decided to weld up some scrap metal tubing and make my own T-Dolly to modify a trailer fender that is going on a 70's style chop here in the shop.   

Pictured here is a standard trailer fender.  If you need one on the cheap, get one form Deep Six Cycles   

After hammering and uses Jay's techniques, I had come up with this:


If a body work hack like me can come up with results this nice, so can you.  Be sure to check out Special 79's tech and how-to's for your next metal fabrication job.

From Trailer Trash to Prom Queen....    


Fabricator Parts - Do it yourself Bungs

Ok, so this post is gonna be a little misleading.   I'm not gonna teach you how to make a weld-in bung from a chunk of soap, or how to carve one out of an old fencepost.

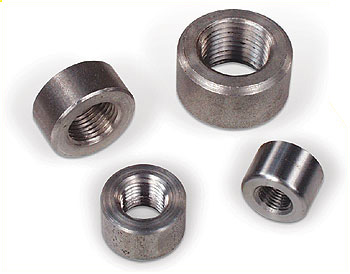
Most of us have bought bungs at some point or another.  They are cheap, easy to use, and just make sense. But, I have found that most of the cheaper bungs on the market look like the ones pictured below.


There ins't much wrong with this style, they do the job.   But, how many of us have played the "Put a bolt in the Bung, try to hold it in place, tack weld it, twist and tug on the bolt to line up the bung to exactly where we want it, break the tack weld while doing so, and then repeat the whole process" game?    

No need to answer that one, I think that anyone who has used a bung like this, especially in a piece of tubing, has run into that problem.   I can't think of how many times I have drilled too large of a hole and dropped a bung into the tubing or had to play the above game to get it lined up exactly where I want it.  The other problem with most prefab bungs, is that they are larger than 1/2" OD, but how many of us own bigger drill bits?  While working on a fuel tank mount this week, I decided to build a whole new style of bung.

Since I was mounting a fuel tank, I was planning on a standard 5/16-18 thread.  I cranked up the lathe, and made a few bungs just like pictured above.  Then I decided to turn down the main section of the bung so that it could easily drop into a 1/2" OD holes (something I could drill with my standard drill set, and a hand held drill)


Drilled a 1/2" Hole in my frame for the tank mounts, and dropped the new style bung into it.


Look Ma!!! No Hands!!!   Its nice to have a bung that will stay in place while I weld it in.  No more sticking a bolt in the bung, twisting it around, burning your fingers, and smelling your own flesh burning.  I can dig it


All welded in (I've been enjoying some Silicon Bronze Filler for stuff like this)


I went ahead and got the front mount welded in while I was at it...


Most people would probably like the bungs to sit lower on the frame, but for a tank mount, I like to keep some room under the tank.  These give a nice 1/8" or so under the tank for wiring, zip ties, foam, etc...  If that doesn't work for you, then once you have the "Do It Yourself" bungs installed, you can grind them down lower to the tube.  If you want a set, they are $12.50 a pair ( and will be added to my "Fabricator Parts" list (once that actually gets put together... )


To Purchase go to our Store:  http://hughshandbuilt.com/shop/

The Devil in the Details - Tank Modifications

I'm building a bike using a "Stock" Mustang tank.   An Ebay special that seemed to fit the build just fine.   People ask me all the time about how to make their bike stand out, or how to make something just that much cleaner.   Well, its the smallest of details that make the difference.

Take for example this filler neck.  Originally these tanks were made from a left and right side Harley fuel tank set.   So dual fillers would be ok in that application.    BUT, this repop tank has a faux filler, and if you know me, you know that FAKE does not belong on a motorcycle.  I don't dig fake oil bags, and I don't dig fake filler necks...   You can send me all the hate mail you want, but the only thing fake that belongs on a Chopper should be a pair of 36DD's on the pillion pad holding of for dear life.  (Make sure your wife and/or girlfriend is ok with this beforehand, I take no responsibility for the actions of my readers)

Stock "filler" necks.  Fake one on the left, doesn't even go anywhere.


Notice that the faux filler neck is already starting to rust, this would be a great place to hold moisture and cause problems in the future.


I cut the filler neck off with a grinder and a cut off wheel.  


Smoothed it all out with a Flap wheel on the grinder.   


Then I TIG Brazed the rest of the recessed area together, mostly to fill the area before painting.  The less body filler, the better if you ask me.   The panel closing the hole was much thinner than the tank, not a good place to gather moisture, or take a chance with leaks.  


Once that was all done, I started on the bottom of the tank.   These "Universal Chopper Gas Tanks" almost always have 3-4 petcock bungs.   I was planning on using the 2 rearmost bungs, and needed to delete the others.   Nothing says "Slacker" like a pipe plug stuffed into a bung you aren't using.  I know its common to do, but like I said, the Devil is in the Details...

I didn't get any "before" pics, but I'm sure you guys know what the standard Harley Male Petcock Bung looks like.   Ugly - Especially if you are just gonna put a pipe cap on it.

Removed the petcock with a grinder and cut off wheel, used a flap wheel to remove the rest of it, and then TIG Brazed the hole shut.    


Once the hole was filled, I blended it all back out on the belt sander, and then hit it with the Angle Grinder and a paint stripper to blend it all back in...  


Remember when you use these "Universal Chopper Tank"s that Universal is something anybody can do, so make it yours, and make it better than you go it.  And don't forget to coat it inside before paint, you don't want a pinhole leak to ruin that nice paint job you are gonna put on your ride...     I only use RedKote tank liner, and you should too...

Checkout the online shop for new parts and service for you ride!

Click Here www.hughshandbuilt.com for more info on parts! Thanks - Hughs.