So one thing that SUCKED about our old blog, was Blogger itself, and how Facebook decided that ALL of our content was spam. This happened a few years back, and I never had time to build a new blog, and Facebook never responded to my many many requests to unblock the Hugh's HandBuilt Blog... So it fell into disrepair, left for the internet to absord and fall into the shadows...
NOT ANY LONGER! We have imported all of the old blog into the new website, and with that, I feel more comfortable being able to post up new tech, blog posts, etc.. knowing that they can be shared and cross posted. The old blog has been deleted, so check out the new one and subscribe...
http://www.hughshandbuilt.com/2015/02/03/happenings-hughs-handbuilt/
I'll eventually delete this old blog, but I don't want traffic to be lost in the meantime...
Thanks folks!
Hugh

Hugh's HandBuilt is a small custom shop in the Mountains on North Carolina.
Tuesday, February 3, 2015

Wednesday, October 22, 2014
New Things...
I know it's been a while since I've updated this blog. Mostly because Blogger has become almost dysfunctional with all other forms of Social Media (for instance, Facebook won't allow any posts from this blog, etc...) so it's had to get excited to do a bunch of updates on a poor platform...
So what does that mean? Well, we are building an entirely NEW website, hoping to have it launched soon. With that new site, will be a new Blog as well (don't worry, I'm also going to repost ALL of the posts from this blog to the new blog, so no content will be lost in the transition) - and with that comes a better ability to market things on other forms of Social Media.
For instance - did you know that we now have NEW 74-UP XS650 Motor Mounts available?


So what else is new? Well, we did discontinue our popular HHB Hydro Clutch swap kits... Why? Well it's as simple as this... The parts we were selling allowed the use of a Hydro Clutch you could buy off of ebay, and swap onto your XS650 using our components. Unfortunately, the quality control of the Chinese made Ebay Hydro Clutch components was soo hit or miss that we couldn't justify sending folks to buy components that may or may not work properly. Combine that with all the tech support, emails, etc.. that the swap kit was requiring - it simply took to much of our time to keep it on the shelf.

Don't Fret though! In true HHB Style, we are going to give you all you need to know to do the swap yourself, we just won't be offering the components for sale in our store any longer. So if you find yourself a complete "Pit Bike Hydraulic Clutch" on Ebay, with roughly 50" of hose (1270mm) or so, you should be good to go - saving money and getting all of your Hydro Clutch Needs in one stop. There are several folks selling them on Ebay with a 1200mm hose which should work fine in a stock application. Shorter or taller bars? Just find a hose length that works for you. But by all means, feel free to do some digging on Ebay and I'm sure you'll find a set that works for you. And since we are discontinuing this item, make sure you get yourself an M8 Jam Nut, a Plastic Washer and a other hardware pictured above to make the swap. Just because this component has been discontinued by HHB, doesn't mean that you folks should go without. Just do us a favor, and do your googlefu before emailing us for any tech support and such - so we can focus on bringing new and cool products to you folks.
What else is new? How about our Speedster Bars!

Inspired by my very first build, these have been a HIT! Allowing for a better fit than clubmans, clip-ons, or drag bars - the HHB Speedster Bars just work a charm for making the bike look AND feel proper, without cramping riding position. Check out the store for more details on those!
Oh yeah, we've kicked out some KILLER Fork Braces for the XS650 while we were in the mood for making cool new stuff - they fit both 34 and 35mm forks (34mm needing some very minor clearancing of the mounting bosses on the fork) and area available in Black Powdercoat, Raw Unfinished Steel, and Nickle Plated finishes. These came out of necessity - Tevan's Resto-Mod XS2 handled pretty badly, even after a 35mm fork swap, so we built these and magically he's now dragging a knee in the curves. This fork brace doesn't come with those kinds of skills, but it sure helps instill some confidence in the front of these old bikes again...

There are a few other things I haven't listed here, like our Neck Gusset Kits, Slimline Master Cylinder, Headlight Mount, Stainless Triple Tree Hardware, and more available on the website - www.HughsHandBuilt.com
So yeah, we aren't going anywhere... In Fact - we just picked up another XS650 for an HHB Test Mule - check out our 1975 XS650 as we beat on it like a red-headed step child. Because it doesn't leave the shop unless it is "Hugh Approved" - and that involves lots of miles, wheelies, and the occasional mishap in the twisties - all in the name of Quality. You deserve the best, and we do our best to make that happen.
Thanks for your continued support folks! Stay tuned to the website, Facebook, and Instagram for other happenings with HHB.
Hugh
So what does that mean? Well, we are building an entirely NEW website, hoping to have it launched soon. With that new site, will be a new Blog as well (don't worry, I'm also going to repost ALL of the posts from this blog to the new blog, so no content will be lost in the transition) - and with that comes a better ability to market things on other forms of Social Media.
For instance - did you know that we now have NEW 74-UP XS650 Motor Mounts available?

Thats right! We've been working on a few things that most folks don't have much information about. It's been a HUGE time struggle between Emails, Doing new R&D on products, keeping up with the forums, etc... But we are going full steam ahead...
What else is new? Hrmmm, we have launched the XS650 Top Motor Mounts as well - not available on our website yet, but you can find them on Facebook or Instagram
NO LONGER AVAILABLE! DISCONTINUED!
NO LONGER AVAILABLE! DISCONTINUED!
Don't Fret though! In true HHB Style, we are going to give you all you need to know to do the swap yourself, we just won't be offering the components for sale in our store any longer. So if you find yourself a complete "Pit Bike Hydraulic Clutch" on Ebay, with roughly 50" of hose (1270mm) or so, you should be good to go - saving money and getting all of your Hydro Clutch Needs in one stop. There are several folks selling them on Ebay with a 1200mm hose which should work fine in a stock application. Shorter or taller bars? Just find a hose length that works for you. But by all means, feel free to do some digging on Ebay and I'm sure you'll find a set that works for you. And since we are discontinuing this item, make sure you get yourself an M8 Jam Nut, a Plastic Washer and a other hardware pictured above to make the swap. Just because this component has been discontinued by HHB, doesn't mean that you folks should go without. Just do us a favor, and do your googlefu before emailing us for any tech support and such - so we can focus on bringing new and cool products to you folks.
What else is new? How about our Speedster Bars!

Inspired by my very first build, these have been a HIT! Allowing for a better fit than clubmans, clip-ons, or drag bars - the HHB Speedster Bars just work a charm for making the bike look AND feel proper, without cramping riding position. Check out the store for more details on those!
Oh yeah, we've kicked out some KILLER Fork Braces for the XS650 while we were in the mood for making cool new stuff - they fit both 34 and 35mm forks (34mm needing some very minor clearancing of the mounting bosses on the fork) and area available in Black Powdercoat, Raw Unfinished Steel, and Nickle Plated finishes. These came out of necessity - Tevan's Resto-Mod XS2 handled pretty badly, even after a 35mm fork swap, so we built these and magically he's now dragging a knee in the curves. This fork brace doesn't come with those kinds of skills, but it sure helps instill some confidence in the front of these old bikes again...

There are a few other things I haven't listed here, like our Neck Gusset Kits, Slimline Master Cylinder, Headlight Mount, Stainless Triple Tree Hardware, and more available on the website - www.HughsHandBuilt.com
So yeah, we aren't going anywhere... In Fact - we just picked up another XS650 for an HHB Test Mule - check out our 1975 XS650 as we beat on it like a red-headed step child. Because it doesn't leave the shop unless it is "Hugh Approved" - and that involves lots of miles, wheelies, and the occasional mishap in the twisties - all in the name of Quality. You deserve the best, and we do our best to make that happen.
Thanks for your continued support folks! Stay tuned to the website, Facebook, and Instagram for other happenings with HHB.
Hugh
Tuesday, July 22, 2014
MountainFest This Weekend!
Well folks, We've been busy as can be, but that won't stop us from getting out and seeing some of ya'll..
MountainFest in Morgantown WV this weekend will be a great time! Hope to see some of ya'll there.. Cycle Source Magazine and a ton of your other favorite motorcycle hooligans will be there, you should be too...

This is a great show, lots of good vendors and custom bikes... PLUS - If you wanna save some coin on HHB Goodies, we'll be offering some cash priced discounts at the show!
More details on the event are here - Click Clicky....
Plan on us being gone through next Monday, so any emails and orders not received by mid day today will likely not be handled until we get back... Thanks for your support folks!
Hugh
MountainFest in Morgantown WV this weekend will be a great time! Hope to see some of ya'll there.. Cycle Source Magazine and a ton of your other favorite motorcycle hooligans will be there, you should be too...
This is a great show, lots of good vendors and custom bikes... PLUS - If you wanna save some coin on HHB Goodies, we'll be offering some cash priced discounts at the show!
More details on the event are here - Click Clicky....
Plan on us being gone through next Monday, so any emails and orders not received by mid day today will likely not be handled until we get back... Thanks for your support folks!
Hugh
Thursday, February 20, 2014
New HHB Product Release! 100% Bolt-On Oil Cooler
It's been long in the tooth, so to say, but as with ALL HHB products, we test, abuse, test, abuse some more, and test again. It's just how we do things. We may not release a new product as fast as we would like, but when we do, you know it's our best!
So with that said, welcome to the HHB Product Line, the Bolt-On XS650 Oil Cooler.

This 100% Bolt-On design is designed, tested, tested again, and redesigned for the ultimate in Bolt-On oil cooler performance.
This is the largest Bolt-On Oil Cooler on the market for the XS650 Side Cover.
We have the largest surface area of any Bolt-On oil cooler on the market, while increasing oil capacity by 120cc’s. More oil and more cooling surface = Cooler Running XS650 Engine!
We’ve tested various filter combinations, checking for oil pressure losses and restriction, and found the OEM style filter works best with the XS650 Oil Pump to keep flow and pressure at a maximum.
Hugh’s HandBuilt Tested and APPROVED!

Where to buy? Why right at our store of course! Click Click On This Link
As always, thank you for your support - we'll keep doing what we do, you keep doing what you do.
Hugh
Hugh's HandBuilt
So with that said, welcome to the HHB Product Line, the Bolt-On XS650 Oil Cooler.
*Shown Polished, currently available in Brushed Finish ONLY
This 100% Bolt-On design is designed, tested, tested again, and redesigned for the ultimate in Bolt-On oil cooler performance.
This is the largest Bolt-On Oil Cooler on the market for the XS650 Side Cover.
- *Large Surface Area Increases Cooling Abilities
- *120cc Oil Capacity Increas
- *Unique 6 Fin Design
- *Uses OEM Oil Filter – No restrictive paper elements here!
- *Brushed Alloy Finish
- *Includes Stainless Hardware, Gaskets and Copper Sealing Washers.
We have the largest surface area of any Bolt-On oil cooler on the market, while increasing oil capacity by 120cc’s. More oil and more cooling surface = Cooler Running XS650 Engine!
We’ve tested various filter combinations, checking for oil pressure losses and restriction, and found the OEM style filter works best with the XS650 Oil Pump to keep flow and pressure at a maximum.
Hugh’s HandBuilt Tested and APPROVED!
Where to buy? Why right at our store of course! Click Click On This Link
As always, thank you for your support - we'll keep doing what we do, you keep doing what you do.
Hugh
Hugh's HandBuilt
Monday, February 17, 2014
750cc XS650 Engine, Rephased and Ready to run!
This is a fairly rare opportunity for someone NOT on the Current HHB Engine Building backlog to get an engine for this year.
This is out of my PERSONAL bike, I'll be doing something else with the chassis soon (email me if interested in the rolling chassis) and has less than 25 miles on it since it was first built.
*This is JUST for the engine, NOT the entire bike*


This engine has 205 lbs of compression, is as fresh as they get, and is available for $6350 (plus your free spinning core) This is slightly below retail for the full cost of the build.
Contact Hughshandbuilt@gmail.com for purchasing information.
*If interested in the Rolling Chassis, make an offer. Will include EVERYTHING except the engine, carbs, charging system, etc...
This is out of my PERSONAL bike, I'll be doing something else with the chassis soon (email me if interested in the rolling chassis) and has less than 25 miles on it since it was first built.
*This is JUST for the engine, NOT the entire bike*

- 750cc JE High Compression Pistons (10:1)
- NEW Big Bore Liners
- 277 Rephase by HHB
- 256 Camshaft
- Ported Head
- NOS Valves
- NEW Valve Guides
- NEW Valve Springs
- NEW Rocker Arms
- Stainless Rocker Plugs
- 277 Ignition by Pamcopete
- Hugh's HandBuilt PMA Charging System (NEW)
- 5th Gear OD
- Polished Shift Rails
- EBC Clutch Plates
- NEW Steel Clutch Plates
- EBC Clutch Springs
- HD Throwout Bearing
- 7 into 6 HHB Modded Clutch Pack
- NEW 447 Crankshaft Rods
- New Gaskets
- New Oil Seals
- New Oil Pump
- New Sump Filter
- Polished Engine Covers
- Re-Chromed Cam Covers
- Polished Valve Covers
- Stainless Hardware
- Kick-Only (no Electric start provision)
- Foot Operated Clutch (easily converted to hand clutch if desired)
- New Shift Shaft
- Aqua Blasted Cases
- Aqua Blasted Head and Cylinders
- New Oil Tube Base Fitting
- New Oil Tube
- New Copper Oil Seals
- New Camchain
- New Cam Guides
- Brass Head Washers
- New Clutch Worm Gear
- 1 Piece Clutch Rod
- Custom Drilled Side Cover
This engine has 205 lbs of compression, is as fresh as they get, and is available for $6350 (plus your free spinning core) This is slightly below retail for the full cost of the build.
Contact Hughshandbuilt@gmail.com for purchasing information.
*If interested in the Rolling Chassis, make an offer. Will include EVERYTHING except the engine, carbs, charging system, etc...
Monday, February 3, 2014
Engine Services and all that jazz...
Well folks, it's February! And with February normally comes the call for engine builds to come in. But this year it just isn't happening... We are still going full steam on engines from last year, and our focus will be on completing all of our current customer builds before taking any more engine builds in...
"Hey Hugh, I read that you aren't taking in any more engine builds, but what about Rephased Crank and Cams? Are you taking those in at this time?"

The answer is YES! Always taking in 277 Degree Rephase Work... So don't hesistate, ship them on in. Current waiting time is still about 2-3 from the time we get them in the door, so there is still plenty of time to get your hands on your own 277 Engine this season - "Some Assembly Required"
And Rebecca, our Official Shop Toddler, Says:

"Hey Hugh, I read that you aren't taking in any more engine builds, but what about Rephased Crank and Cams? Are you taking those in at this time?"
The answer is YES! Always taking in 277 Degree Rephase Work... So don't hesistate, ship them on in. Current waiting time is still about 2-3 from the time we get them in the door, so there is still plenty of time to get your hands on your own 277 Engine this season - "Some Assembly Required"
And Rebecca, our Official Shop Toddler, Says:
"Dad! There's something wrong with this one, it's not Rephased!"
We are really looking forward to all that 2014 has in store for us, thanks as always for your support.
Hugh
Hugh's HandBuilt
Thursday, December 19, 2013
21 Questions with Michael "Hugh" Owings
I can't say that I'm not proud of this one. I've watched the Chop Cult feature some amazing builds and builders. To be included with that bunch of folks, is truly an honor.
21 Questions with Michael "Hugh" Owings

I'm not gonna steal the 33's thunder, but pop on over and check it out.
And I'm not sure I'll have another update before then, so I hope all of you have a Very Merry Christmas - from the HHB family to yours.
Hugh
21 Questions with Michael "Hugh" Owings
I'm not gonna steal the 33's thunder, but pop on over and check it out.
And I'm not sure I'll have another update before then, so I hope all of you have a Very Merry Christmas - from the HHB family to yours.
Hugh
Monday, November 25, 2013
Hugh's HandBuilt Black Friday Sale!
In the Spirit of Thanksgiving - we want to show our thanks for all of your support!
We haven't had a good sale in a long while, so this coming Wednesday through Friday we are offering a 10% Discount on ALL Items in our webstore that are in-stock.
Use Coupon Code - Thank You!
*Items not in stock or on Backorder will be excluded from sale, sale will not apply to shipping costs. 10% Applies to any and all Items in Stock during the sale dates ONLY.

We haven't had a good sale in a long while, so this coming Wednesday through Friday we are offering a 10% Discount on ALL Items in our webstore that are in-stock.
Use Coupon Code - Thank You!
*Items not in stock or on Backorder will be excluded from sale, sale will not apply to shipping costs. 10% Applies to any and all Items in Stock during the sale dates ONLY.

From our little HHB Family to yours, Thank-You for your support!
Hugh
Hugh's HandBuilt
Tuesday, November 19, 2013
Keeping up with the Jones's (Or the Hugh's, either way really)
To Quote Arlo Guthrie's "Alices Restaurant Massacre" lyrics -
"but we had fun filling out the forms and playing with the pencils on the bench there,
and I filled out the massacre with the four part harmony, and wrote it
down there, just like it was, and everything was fine and I put down the
pencil, and I turned over the piece of paper, and there, there on the
other side, in the middle of the other side, away from everything else on
the other side, in parentheses, capital letters, quotated, read the
following words:
Find us on Facebook
We have a "Hugh's HandBuilt Yard Sale" section on facebook, you never know what you'll find there... Give us a "Like" if you would....
Find us on Instagram
Our Instagram is updated almost daily... Random happenings around the shop, tech, parts for sale, new releases, and the occasional antic from around the shop. Toss is a few pics of Roxxy the dog and a some other things that inspire us and you'll find Instagram a fun way to keep up with Hugh's HandBuilt
Find us on Youtube
So yeah, I suck at editing video's, and I don't have a nerd to help me with that (yet.... taking applications for HHB Nerd) but from time to time, we'll put up a new video...
PS - Thanksgiving is coming soon, enjoy some time with your family and loved ones, but if this isn't played at least 1 time on Thanksgiving day, then you are probably doing it wrong....
Folks, I can't thank you enough for your support and continued encouragement. Thank-You!
Hugh
"but we had fun filling out the forms and playing with the pencils on the bench there,
and I filled out the massacre with the four part harmony, and wrote it
down there, just like it was, and everything was fine and I put down the
pencil, and I turned over the piece of paper, and there, there on the
other side, in the middle of the other side, away from everything else on
the other side, in parentheses, capital letters, quotated, read the
following words:
("KID, HAVE YOU REHABILITATED YOURSELF?")"
So what have we been doing at Hugh's HandBuilt you ask? Well, how about
some updates from the folks around here. We've been contacted by
Discovery Channel and asked to submit applications for the upcoming
Biker Build-Off series. I'm not counting any chickens til' they've
hatched, but we had alot of fun making the video's and we figured we'd
share them with ya...
Meet "Hugh" of the Hugh's HandBuilt Team
A tour of the new shop - we love it here!
Bryan - Smells worse than my dog....
Tevan - My Number 1 Man... Love this kid
I'm not saying this
changes anything or that we've been Rehabilitated in any shape or form,
but we have enjoyed the process, and hope to see some great underground
shops on the show.
We are keeping our Facebook pages updated more often, along with Instagram, Youtube, and the website. You might find deals, new products, etc... So it never hurts to keep up...Find us on Facebook
We have a "Hugh's HandBuilt Yard Sale" section on facebook, you never know what you'll find there... Give us a "Like" if you would....
Find us on Instagram
Our Instagram is updated almost daily... Random happenings around the shop, tech, parts for sale, new releases, and the occasional antic from around the shop. Toss is a few pics of Roxxy the dog and a some other things that inspire us and you'll find Instagram a fun way to keep up with Hugh's HandBuilt
Find us on Youtube
So yeah, I suck at editing video's, and I don't have a nerd to help me with that (yet.... taking applications for HHB Nerd) but from time to time, we'll put up a new video...
PS - Thanksgiving is coming soon, enjoy some time with your family and loved ones, but if this isn't played at least 1 time on Thanksgiving day, then you are probably doing it wrong....
Folks, I can't thank you enough for your support and continued encouragement. Thank-You!
Hugh
Monday, October 28, 2013
How-To: Install Your Weld-On Headlight Mount
This one is SIMPLE folks...
We all know that the XS650 Vibes are pretty tough on brackets, tabs, etc... We've been using this style headlight mount since our very first XS650 Project, and never had a single failure. PLUS, it looks killer and is as clean as it gets - No Bolt On brackets here...
 Normally, my How-To's are super in depth, but this one is gonna be sweet and to the point.
You'll need these tools:
Im not gonna show you how to remove your lower tree (it's not 100% required, but probably a good idea to get in there, repack your bearings, repaint, etc..) but I will show you the simple steps to installing the New HHB Weld-ON Headlight Bracket.
1. See those ugly mounts on your Lower Tree? I marked them in Yellow Paint Pen, but those have got to go...

2. Grind off all of those mounts flush with the body of the lower tree, you may need to blend out a few areas but you get the idea.
3. The HHB Weld-On Headlight Mount has a "notch" in it, line it up with the casting rib on the bottom of the tree. *This pic was taken AFTER welding, but should be able to help you through this step just fine

4. Weld that sucker on there. After locating the bracket how you want, I typically add a tack weld or two to hold it in place. Final welding was done with a TIG in this pic, but MIG is just fine as well. In the past, I've even built the weld up enough and blended it out - making for a really nice finished piece.

5. Go grab a cold one, because you are DONE! Well kinda, but that cold refreshment will make the mundane task of reassembling the front end a bit more enjoyable. Bolt up your headlight and call it done...
*The HHB Weld-On Headlight Mount is designed for use with BOTTOM MOUNT Headlights, and has 2 mounting holes to allow you to custom tailor where the headlight sits on your bike. We think ahead like that, so you don't have to...
"Hugh, Where do I buy this?"
In Our Store of course... Make sure to keep an eye on the store and the blog, as we have plans for lots of new products in the works.

Thanks so much for your business and support folks - we love our job, and you folks make it a blast to come to work each day...
Hugh
We all know that the XS650 Vibes are pretty tough on brackets, tabs, etc... We've been using this style headlight mount since our very first XS650 Project, and never had a single failure. PLUS, it looks killer and is as clean as it gets - No Bolt On brackets here...

You'll need these tools:
- Angle Grinder w/Flap Wheel and Grinding Wheels
- Welding Equipment

Im not gonna show you how to remove your lower tree (it's not 100% required, but probably a good idea to get in there, repack your bearings, repaint, etc..) but I will show you the simple steps to installing the New HHB Weld-ON Headlight Bracket.
1. See those ugly mounts on your Lower Tree? I marked them in Yellow Paint Pen, but those have got to go...

2. Grind off all of those mounts flush with the body of the lower tree, you may need to blend out a few areas but you get the idea.
3. The HHB Weld-On Headlight Mount has a "notch" in it, line it up with the casting rib on the bottom of the tree. *This pic was taken AFTER welding, but should be able to help you through this step just fine

4. Weld that sucker on there. After locating the bracket how you want, I typically add a tack weld or two to hold it in place. Final welding was done with a TIG in this pic, but MIG is just fine as well. In the past, I've even built the weld up enough and blended it out - making for a really nice finished piece.

5. Go grab a cold one, because you are DONE! Well kinda, but that cold refreshment will make the mundane task of reassembling the front end a bit more enjoyable. Bolt up your headlight and call it done...
*The HHB Weld-On Headlight Mount is designed for use with BOTTOM MOUNT Headlights, and has 2 mounting holes to allow you to custom tailor where the headlight sits on your bike. We think ahead like that, so you don't have to...
"Hugh, Where do I buy this?"
In Our Store of course... Make sure to keep an eye on the store and the blog, as we have plans for lots of new products in the works.

Thanks so much for your business and support folks - we love our job, and you folks make it a blast to come to work each day...
Hugh
Wednesday, October 23, 2013
DIY - Stick Out Your Neck, and Show It Off!
First off, yes I know it's been a while since I've posted any DIY or Tech Articles... If you haven't noticed, we've been a tad bit busy this year with a "few" setbacks... But in order to get back into the groove, we've decided to do what we do best, and give you fine XS650 Gearheads a new Tech Article from HHB...
Stick Out Your Neck! And Show It Off!!


Take your paint pen, and make a line just outside of this weld... Like so...


This is where we just made your job WAY easy... Grab those locking pliers, grab this sucker by the gusset of it's neck, and twist until it pops right off...
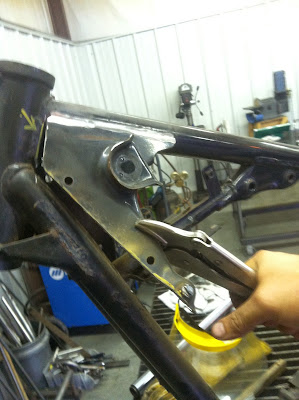


That was easy, and clean.. Plus, we haven't harmed the OEM tubing at all.


Take your time, and work both sides evenly until you are satisfied with the results. Remove as little as needed to make it looks smooth and even. You'll likely go ahead and cut off the tachometer cable guide, and blend out the welds on the downtubes where the frame is sleeved. Don't take too much, you can always spot weld the low spots and re-work them as needed.




Folks, I hope this tech article gives you faith in your abilities. If you aren't afraid of picking up a grinder and making the sparks fly, this is a great modification to do to your bike. It will stand out among the crowd, and it's always important to make a good first impression.
Stick Out Your Neck! And Show It Off!!

Our New HHB "Goose" Neck Gusset Kit
We haven't done any tech articles requiring welding, grinding, blending and other methods of torturing steel before, so lets cover all the bases...
Q: "Hey Hugh, what tools will I need for this mod?"
A: "Listen up, ALL MEN need the following tools, just because - And grow out a beard while you are at it."
If you budget is tighter than *Hipster Jeans, then you might wanna do some shopping around at Harbor Freight or the Pawn Shops - you'd be surprised at just how cheap you can own some of these power tools... And if you end up killing them, upgrade as you go... A man can never have too many tools... Period.
Compile the Following:

From Top Left:
- Grab a Handful of Cut-Off Wheels
- 120 Grit Flap Disk
- "Medium" 3M Type Polishing Pads
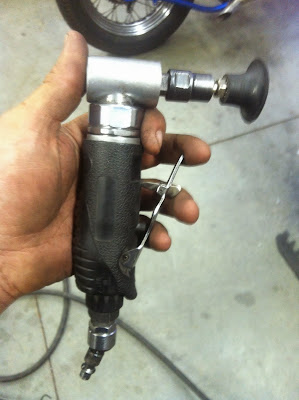
- 90 Degree Die Grinder (not required, but makes for a nicer finish)
- Welding Helmet - Because Flash Burn SUCKS
- A Good Pair of Locking Pliers - I found these in the middle of the road - true story...
- Angle Grinder - **You probably already have this, or at least you should
- Paint Pen or some kind of good marker
- Welding Equipment - I use both TIG and MIG, but MIG is just fine for this job
- NOT SHOWN - Face Mask/Shield, because getting your eyeballs drilled also sucks - SAFETY FIRST
- ALSO NOT SHOWN - Wire Wheel for Grinder - AKA The Nut Grinder
A: "Removing Ugly from the Custom Bike Scene!"
If you have an XS650 (who am I kidding, if you are reading this, you already have the disease, and "An XS650" is probably the least of your worries - it's ok, we call it a hoard of Japanese Excellence) then you already know just how ugly the stock neck gusset is...

Thats a whole lotta ugly goin' on!
I just can't stand it, and I know you can't either... Go to the next big bike event, and look at the custom XS650's around - and you'll see more than a fair share of them rocking this ugly gusset for all the world to see - Have They No Shame!
Now, to remove this offensive pile of soon-to-be-scrapmetal. And lets do it proper.. I've done more than a few of these, and learned some tricks along the way to share with you folks.
Do you have something like this on your Angle Grinder?

These are only used by cavemen, trust me.
If you do, then TOSS THAT MOFO ASIDE! You'll often see me talking about "The Details Matter" - and this particular style of grinding wheels is NOT used to make anything nice - ever...
This is more like it:

I can't tell you how amazing is was to "Discover" these may years ago
changed my life forever
I prefer to use a 120 Grit Flap Wheel, it's aggressive enough to do the job, but smooth enough to not eat up your work too fast... You can get them in different grits, but 120 is just fine for now.
You are going to use the flap wheel on your angle grinder, and lightly blend off the top weld of the OEM Neck Gusset. Do NOT grind into the tubing, you don't need to go that far just yet. Always wear eye protection - please...

You want to see something like this, no need to go further.

Take your paint pen, and make a line just outside of this weld... Like so...

Don't try to cut too close to the weld, or you'll hit the neck tube...
Use the Cut-Off wheel and do some damage... Just be careful not to cut into the tubing, focus on the gusset only...


Next move - Cut the OEM Reflector Mount off...

Removing that stud will allow you better access to move on, so move on we shall...
Use the paint pen to mark just above the weld all the way along the downtube.

Let the sparks fly, and it should look something like this when you are done...

This is where we just made your job WAY easy... Grab those locking pliers, grab this sucker by the gusset of it's neck, and twist until it pops right off...


That was easy, and clean.. Plus, we haven't harmed the OEM tubing at all.

Such and appealing design huh? Ummmm.... NO
Repeat steps 1 through whatever on the other side... If you needed a "Paint by numbers" description more detailed than this for the other side, I suggest you put down the tools and go back to playing video games in your mom's basement...
Ok, so maybe you just crawled out of the basement and still want to finish this thing, it should look something like this at this point...

Next comes a little finesse on your part. Take it nice and slow, using the flap wheel, and take the welds down to the tubing, blending in and looking as if nothing was ever there. I prefer to take long sweeping passes over just staying in one spot too long. It's ok to take your time on this part, as the time you put in now will pay off - and again, take a look around the next bike show - you can see who did and who did not pay attention to these minor details.


Now that you have all of the welds blended away with the 120 Grit, I like to go over the frame with a wire wheel. Beware, while it may appear that this tool is the best at removing paint and rust, that is a ploy - it's #1 job is to stick little stainless wires as deep into your skin as possible, and remove fingerprints faster than acid if you hit yourself with this... I also have a story about a friend using one of these while wearing a pair of Umbro Shorts years ago - ask me sometime, it's hilarious... DO NOT do what he did... Wear protection for your face AND your junk... Just sayin'


Believe it or not, but these wire wheels will help blend out the sanding marks from the 120 grit flap wheel - and create an even smoother surface than you had with just the flap disk. If you get really bored, look up "Metal Finishing" sometime online, you can learn a TON of tricks and tips to apply to your build. Again, these details matter in the end. If you can't tell you've done anything to the neck, you've done a great job.
After the wire wheel, I fire up my 90 degree Die Grinder with a 3M type "Medium" pad, and just about polish the tubing with it... The cleaner you get your materials, the better they will weld up. Clean and smooth is the name of the game. This step isn't required, but I like to go above and beyond sometimes to show you just how nice a job you can do.


Dude, I'm with you - this looks KILLER already... But now something new seems to stand out... And not in a good way...


Now I don't know about you, but cleaning the brackets off of this tube looks like a fairly daunting task - or at least to do it nice and clean just like you did your frame already... I've seen plenty really nice looking bikes where this tube looked like a ride at Six Flag Theme Park after all the grinding and blending - so lets do this right...
Get to town removing this sucker! A little time with the grinder and cut-off wheel and you should be looking at something bout' like this..


Now the next steps might confuse ya, but hang with me a bit. Sometimes "looking stock" is not a bad thing, so we are going to fit the new tubing (supplied with your HHB Gusset Kit) into the frame just as if it always belonged there... And it will be a nice touch that no-one will notice, and again - that's a good thing... The focus should be on the overall design and style of your build, not the grinding marks and welding - but thats just me...
Use your paint pen, and mark the OEM welds on the upper motor mount.

Now you are not going to try and remove the tubing entirely from this joint, you just want to cut and blend enough that when you install the new tubing it looks just like stock...
Follow along, take your time with the grinder, flap wheel, cut-off wheel, etc...


Up front, you've probably found a bit of rust (don't stress, almost ALL XS650's have this rust behind the neck) so don't freak out. If you are planning on having the frame powdercoated, they'll probably sandblast it nice and clean. If not, take the time to blend out all of the rust as the pits will show in your paintwork unless you do some bondo/filler over it all. Just a heads up, as I know if you've done all this effort, you want it to be top notch... And I don't blame ya...

Blend that tubing down the best you can, it's a tough spot to get to, but I got faith in ya...

Not Perfect, but this'll do - get that rust cleaned up the best you can though.
Next up, fitting the new tube into place... You'll earn your man-card on this minor piece. You'll learn to notch tubing, and fit up a totally oddball fit on the other end...

Q: "Hugh, did you say we'd have to notch that tubing? I don't see a tube notcher in the tools list."
A: "Exactly, I'm teaching you how to do this on a budget, and get some skills under your belt. I bet you didn't know it, but I'm a fiddler player too... ***So sit right in that chair right there and let me show you how it's done... "
PS - Our HHB Neck Gusset Kits will come with this end Pre-Notched
PS - Our HHB Neck Gusset Kits will come with this end Pre-Notched
Oh wait, there I go singing along and writing tech articles again....
You can easily notch tubing with your grinder. I mark my tubing like so, make the cuts with a cut-off wheel, and blend out the sharp edges with the flap disk...


Believe it or not, this method is faster than dragging out a notcher, setting it up, and cutting the notch. When I worked for an off-road fabrication shop, we put it to the test and it wins everytime unless you are doing the same notch over and over again - then the notcher winds... It's not always about having the best tools.
Now with the front end notched and fitted up, mark the outline of the cut for the motor mount bracket. This may take you a few minutes, but take your time.. Grandpa* always said "Measure 2X and Cut Once" - it took me a great many years to grasp the importance of that...


Take your time, cut slowly and fit this up as nice as you can...


The motor mount is wider than the tubing, and thats the way we want it, just like OEM...
Now, before you do ANY welding, PREP PREP PREP the surfaces. Clean the paint, grinder dust, rust, etc... The better you clean it, the nicer the final weld will be.

Now, some folks might wonder why I didn't TIG weld this joint. I MIG welded this particular joint because I wanted it to look like a stock fit piece of tubing. I don't plan to blend out the weld, I like to leave it just like this. To each their own, there is no right or wrong here, so feel free to be creative..


Sooo much better
Now, I'm sure you've seen plenty of frames with the gussets cut completely out - and they look pretty slick for sure. But I'm here to tell ya, after abusing some of these old bikes, anything to stiffen up the front end can't hurt. So let's add the Gussets...
You may need to notch around the OEM welds a minor bit - but if you just accomplished installing that tube brace above, then you are feeling mighty confident enough to handle this tall task - haha...

HHB Neck Gusset "The Goose" - Inspired by Vintage BMX Neck Gussets
Fit it up, and lightly tack the gusset in... Don't fully weld just yet...

These Dimpled Gussets and new frame tube are a full One Lb lighter than OEM, and will be plenty rigid while looking a bit nicer than what the factory gave ya. Lighter = faster, and if you know HHB, then you know Fast XS650's is Kinda Our Thing...
Get both sides tacked in, and you are ready for final welding. (I did not final weld these, as I plan to use this frame to mockup a few other gusset designs we have coming out VERY soon)

Our HHB Gussets are Designed to Clear Most Aftermarket
Fuel Tanks while providing rigidity to the frame.
Folks, I hope this tech article gives you faith in your abilities. If you aren't afraid of picking up a grinder and making the sparks fly, this is a great modification to do to your bike. It will stand out among the crowd, and it's always important to make a good first impression.
As always, thanks so much for your support! These new gusset kits will be available soon on the website store - CLICKY CLICKY! Our New Store has a TON of great new products we've been working hard to bring to you fine folks. Check it out, give us feedback, order parts, live long and prosper...
* Bonus Hipster points if you have tools in your garage that your friends have never heard of.
** Triple Bonus Points if you have one grinder for each type of wheel, seriously you can't have too many angle grinders...
*** If you aren't listening to some damn good music in the shop, you are doing it wrong. PS - If it's on the Top40 - or if the "Band" doesn't use real instruments, you are probably doing it wrong.
**** Call your Grandfolks, they'd probably love to hear from you... After all, without them, you wouldn't exist...
Subscribe to:
Posts (Atom)